Honest reviews of all things tech & travel

CapCut

Cap Cut: Your Ultimate Guide to Video Editing Mastery

Disclaimer: Some of the links in this article are affiliate links which, if you click and buy something I will receive a small amount of money in commission at no extra expense to you. As an Amazon affiliate, I earn from qualifying purchases.

Table of Contents

Capcut Video Editor Review

CapCut is a powerful video editing tool that has gained popularity for its user-friendly interface and wide range of features. As an all-in-one video editor, it allows us to easily create and enhance video content. Whether we are beginners or experienced creators, CapCut offers tools that cater to our editing needs.

With features like animations, keyframes, and AI-driven effects, we can take our videos to the next level. CapCut supports various social media platforms, enabling us to optimize our content based on audience preferences. This flexibility makes it an essential tool for anyone looking to engage viewers effectively.

Let’s explore the exciting features and techniques CapCut offers, as well as tips on how to make the most of this versatile software.

Key Takeaways

  • CapCut simplifies video editing for creators of all skill levels.
  • We can enhance our content with AI features and animations.
  • Optimizing videos for social media is easy with CapCut’s tools.

Getting Started with CapCut

To begin my journey with CapCut, I will explore its interface and learn how to set up my first project. This app provides various editing tools and templates that make video editing accessible for beginners.

Understanding the Interface

When I open CapCut, I was greeted by a user-friendly interface. On the main screen,I saw My  project area, a timeline view, and available editing tools on the side.

Key tools include:

  • Edit: Crop, split, or adjust clips.
  • Audio: Add music or sound effects.
  • Text: Insert titles or captions.

I also found the templates for projects, which make starting easier. These help me create exciting videos quickly. The intuitive layout means I can explore features without feeling overwhelmed, making it perfect for beginners.

Setting Up Your First Project

To start my first project in CapCut, I tap the “+” icon to create a new project. Then, I select videos or photos from my device to edit, bringing me to the editing screen.

Steps to follow:

  • Import Media: Select videos or photos from my camera roll.

  • Choose Templates: Pick a template to simplify editing.

  • Edit Clips: Adjust footage using editing tools.

As I work, I can add effects, transitions, and music to make my video more engaging. CapCut’s intuitive tools make it easy to create unique, personalized content that reflects my style.

This streamlined process helps me turn creative ideas into stunning videos effortlessly.

Editing Techniques

In my CapCut video editing journey, I can do many things. I can apply transitions and effects, cut and trim precisely, and explore advanced color grading. Each one is important to make my videos more interesting and visually good.

Transitions and Effects

Transitions connect clips together. In CapCut I can choose from many transitions. I just drag it between two clips on the timeline.

Popular transitions:

  • Fade In/Out

  • Wipe

  • Slide

These make my video flow. Effects can also make my footage pop. I can add filters like vintage or cinematic looks to set the mood. Simple animations can grab attention too. CapCut lets me preview these effects so I can choose what’s best.

Basic Cuts and Trimming

Cutting and trimming is important to make a professional video. We start by selecting a clip on the timeline. To cut, I can move the playhead to my desired point and click the “Split” button. This will let me remove unwanted parts easily.

I can also trim clips by dragging the edges of each clip in. This will help me adjust the length of my scenes and keep only the best parts. Cutting is important to keep the viewer interested. Consistent pacing makes my content flow and keeps the audience engaged.

Advanced Color Grading

Color grading makes my video look better. In CapCut I can adjust brightness, contrast, saturation and more. I can start by selecting my clips and go to color settings.

Using presets can be fast but manual adjustments let me have a custom look.

Key adjustments:

  • Brightness: Increase or decrease light.

  • Contrast: Increase the difference between light and dark areas.

  • Saturation: Increase or decrease color intensity.

These changes can convey emotions and can make my video feel better. Color grading takes practice but it’s worth it for great visuals.


Adding Text and Audio

When editing videos, adding text and audio is a simple but powerful way to make them more engaging and polished. Here’s how we can do it in CapCut:

Adding Text Overlays

Adding text overlays in CapCut is straightforward. Just open the Text panel, pick a style or template, and click the “+” icon to place it on the timeline. From there, we can customize everything—font, color, size, and spacing—to match our video’s vibe.

Want to make it pop? Add animations for a dynamic touch. Subtitles are another great option, especially for accessibility. CapCut even has a speech-to-text feature to create captions automatically.

Managing Sound and Music

Good audio brings a video to life. In the Audio panel, we can browse CapCut’s music library or upload our own tracks. Need a voiceover? The text-to-speech tool makes it easy. Sound effects? Add them directly or import your favorites.

Balancing audio is key—adjust volume levels so every element complements the overall sound. Done right, text and audio can turn an ordinary video into something unforgettable. 


Animation and Keyframes

In CapCut, we can animate with keyframes and control movement, scale and rotation of visual elements. Knowing how to use dynamic movements and auto velocity will level up our editing.

Dynamic Movements

To create dynamic movements we add keyframes where we want an effect to start and end. Keyframes are points in our timeline that tells the position of elements.

  1. Select Clip: First we select the clip we want to animate.

  2. Add Keyframes: We tap on the keyframe icon at the points in the timeline we want.

  3. Adjust Properties: We can adjust position, scale and rotation between keyframes.

This way we get smooth transitions and nice animations. We can also use easing for a more natural movement. Easing controls how fast the changes happen and makes our animation flow better.

Auto Velocity

The auto velocity in CapCut allows us to automate animations easily by adjusting the speed of the movements. We can get dramatic effects without having to do complex manual adjustments.

When we enable auto velocity:

  • Speed Control: CapCut adjusts the speed of the transitions between keyframes.

  • Dynamic Presence: This makes our animations feel more alive and interactive.

We can customize the acceleration and deceleration points and our movements will look more realistic. By doing this we add a pro touch to our projects without much effort.

AI Features and Automation

In  CapCut testing I found that the AI features make video creation so much easier. Automation tools make it accessible for both newbies and pros. I will focus on using AI and auto-editing options.

Using AI

CapCut has many AI features that can improve My videos. The AI will refine visuals and audio so My content looks pro. I can use smart filters and effects that will analyze the footage and apply the best enhancements automatically.

And CapCut also has AI tools for adding text and captions. This saves Me time and effort as the computer can generate subtitles or creative titles based on My script or audio. The ability to create content fast improves My workflow and viewer engagement.

Auto-Editing Options

The auto-editing features in CapCut make video making easier. With Auto Cut Clip Editor I can quickly trim My clips and remove unwanted parts. This is good for both newbies and pros, I can keep My edits high quality without too much manual work.

I can also use templates that match different themes and styles. These are customizable and I can make videos in minutes. Export options also let Me share My videos to different platforms and adjust to specific resolutions and formats

Optimizing Videos for Social Media

To connect with My audience effectively, it’s important to tailor My videos for each platform. Since every social media site has its own format and style, let’s focus on two of the most popular: TikTok and YouTube.

Creating Videos for TikTok

TikTok thrives on vertical videos, so we should use a 9:16 aspect ratio to ensure our content fills the screen on mobile devices. While TikTok allows videos up to 10 minutes, shorter clips—about 15 to 30 seconds—perform best, grabbing attention quickly.

To boost engagement, we can add popular music, eye-catching visuals, and trending hashtags. TikTok’s fast-paced environment rewards creativity and immediacy, so keeping our message short and impactful is key.

Optimizing Content for YouTube

YouTube’s ideal aspect ratio for standard videos is 16:9, while Shorts work best with a 9:16 format. For regular uploads, videos between 7 and 15 minutes strike a balance—long enough to provide value but short enough to maintain interest.

To grab viewers from the start, I focused on an engaging introduction. Clear titles, detailed descriptions, and custom thumbnails help improve search rankings and encourage clicks. On YouTube, it’s all about storytelling and presenting polished, professional content.


Specialized Editing Features

CapCut has some great tools that make video editing easier and more creative. Here’s how we can use two of them:

Chroma Key

The Chroma Key tool helps me remove backgrounds from my videos. It’s easy to use—just select your video layer, turn on the chroma key effect, and pick the color you want to remove (usually green or blue). Then, adjust the sensitivity to clean up any rough edges or shadows.

This feature lets us replace the background with anything we want, like a new scene or image, making our videos look more professional and fun.

Overlays and Backgrounds

Adding overlays and backgrounds gives our videos more depth and style. I can layer images, effects, or other clips over the main footage for a creative touch. Just add a new layer, choose what you want to overlay, and adjust things like opacity to blend it nicely.

CapCut also has built-in backgrounds we can use to match our video’s theme. These simple steps make My videos more engaging and visually appealing.

Frequently Asked Questions

How Do I Download CapCut?

For mobile devices, you can download CapCut from the App Store (iOS) or Google Play Store (Android). If you’re using a computer, head to the official CapCut website to download the desktop version, which works on both Windows and macOS.

Is CapCut Free?

Yes, CapCut is completely free to use. There’s no subscription or upfront cost, which makes it a great option for anyone.

What Features Does CapCut Offer?

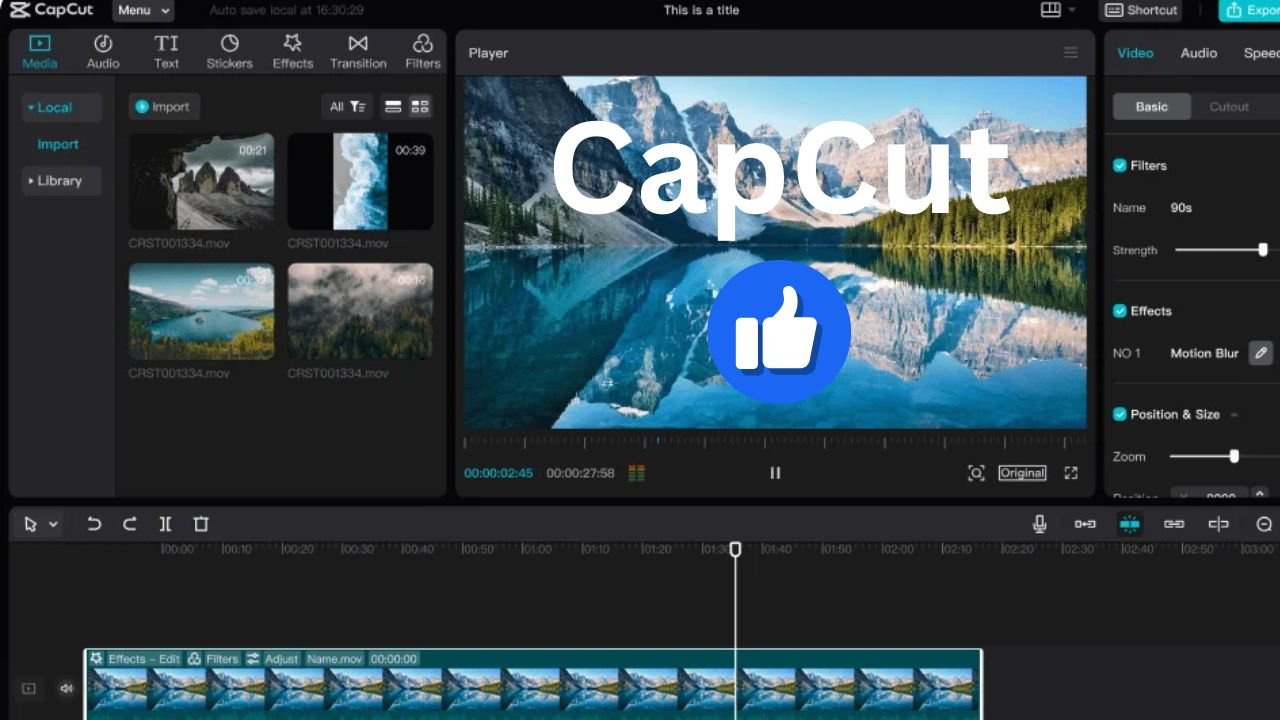
CapCut gives you all the basic editing tools like trimming, splitting, and adding music, filters, and transitions. It also includes advanced options like chroma key (green screen), keyframe animations, and support for exporting videos in 4K resolution.

Can I Use CapCut on a PC?

Yes, CapCut is available for PC users. You can download the desktop version for Windows or macOS from CapCut’s official website.

How Do I Add Music to My Videos?

Adding music is simple. Tap the “Audio” option in the app, then choose “Sounds.” You can pick from CapCut’s library or upload your own music. Once added, you can adjust the timing to match your video perfectly.

Is CapCut Beginner-Friendly?

Definitely! CapCut is designed to be easy to use, even if you’re new to video editing. Its clean interface and helpful tutorials make it a great choice for beginners.

These tips should help you get started with CapCut and make the most of its features!

How does it compares to the top paid programs

How They Compare to Capcut

FeatureAdobe Premiere ProFinal Cut ProFilmoraCapCut
Ease of UseModerate learning curveModerate, macOS-focusedBeginner-friendlyExtremely intuitive
PriceSubscription-based (~$20/month)One-time ($299)Moderate ($69.99/year)Free with in-app purchases
Platform SupportWindows, macOSmacOS onlyWindows, macOSMobile (iOS, Android), Web
Templates/PresetsLimitedModerateExtensiveVast, community-driven
Advanced EditingProfessional-gradeProfessional-gradeSemi-professionalBasic, with trendy effects
Rendering SpeedAverageLightning-fast on macOSFastOptimized for mobile use

MY Final Thoughts

  • Adobe Premiere Pro is ideal for professionals handling large projects with complex needs.
  • Final Cut Pro is best for macOS users who want high performance and professional features with a one-time cost.
  • Filmora strikes a balance between simplicity and advanced capabilities, perfect for semi-professional editors.
  • CapCut shines for casual and social media creators due to its free, mobile-first platform and accessible tools.
Recommended by Big T Honest Reviews

CapCut is a great option for the task of video editing especially if one is a social media creator or wants to edit videos in the shortest time possible. It is therefore very appealing that it is free to use, coupled with the fact that it is mobile friendly. CapCut is a very user-friendly application that is perfect for beginners, and therefore anyone can come up with professional-looking videos. Another of its advantages is the availability of a large number of templates, transitions, and effects, a significant portion of which is updated by the community regularly to reflect the current trends. Also, it is convenient that it is available on the mobile and web platforms so you can use it on any device and not lose your work. CapCut also does a great job of offering tools with AI technologies such as the auto-subtitle and background remove which makes editing easier. If you are a social media user, especially professional TikTok with and little Instagram, effort. CapCut In provides general, the it best is export a settings great that tool help that your offers videos a to simple look and intuitive interface, a rich set of tools and features, and is very accessible—ideal for users who are just starting their journey into video editing or for those who want to unleash their creativity.

Here are the cameras I like to use
Sign up to my newsletter to be informed of all new reviews
Share this